

Introduction
Vacuum is everywhere in modern life—food packaging, semiconductor fabrication, freeze-drying, lab filtration, HVAC service, medical devices, and even space simulation. Yet measuring vacuum can feel confusing because you’re not “measuring nothing”; you’re measuring how much gas pressure remains compared to a reference. That reference might be the local atmosphere (which changes with weather and altitude) or a defined absolute standard. The right method also depends on how strong the vacuum is: a simple mechanical gauge may work for rough suction, while high-vacuum systems require sensors that respond to molecular density.
This article turns the topic into a clear, usable playbook: you’ll learn which units matter, which gauge types fit which pressure ranges, how to avoid common errors, and how to interpret readings in real applications. If you’ve ever wondered how a Measuring Vacuum is measured in a way you can trust, you’re in the right place.
What “vacuum” really means: absolute vs. relative pressure
Before choosing any instrument, it helps to define what you’re actually trying to quantify. A vacuum is not a separate “substance”—it’s simply pressure lower than ambient atmospheric pressure. Many measurement mistakes come from mixing up “below atmosphere” readings with true absolute pressure.
Key facts to anchor your understanding:
- Atmospheric pressure varies by weather and altitude (roughly 101,325 Pa at sea level).
- Vacuum can be expressed as:
- The pressure in an ideal vacuum, which is 0 Pa absolute, is called absolute pressure.
- Gauge pressure is referenced to the local atmosphere and can be expressed as a negative value relative to ambient pressure.
- A reading like “-80 kPa” only makes sense as a gauge value; the actual pressure depends on the pressure in the area.
- Many industrial controllers and data sheets specify pump performance in absolute units.
When training staff or documenting procedures, please ensure the reference is clearly stated. A common beginner question is, “How do you Measuring Vacuum correctly?” —Begin by saying whether you need exact pressure (best for science and engineering) or relative suction (most common in field service work).
Vacuum units that matter (and how to convert them)
Because different industries developed different standards, Measuring Vacuum are reported in several units. The most important habit is consistency: pick one primary unit for your process and convert everything else into it.
You’ll commonly see vacuum measurement units such as Pascals (Pa), kilopascals (kPa), millibar (mbar), Torr (mmHg), and inches of mercury (inHg). For engineering work, SI-based units simplify calculations and specifications across regions.
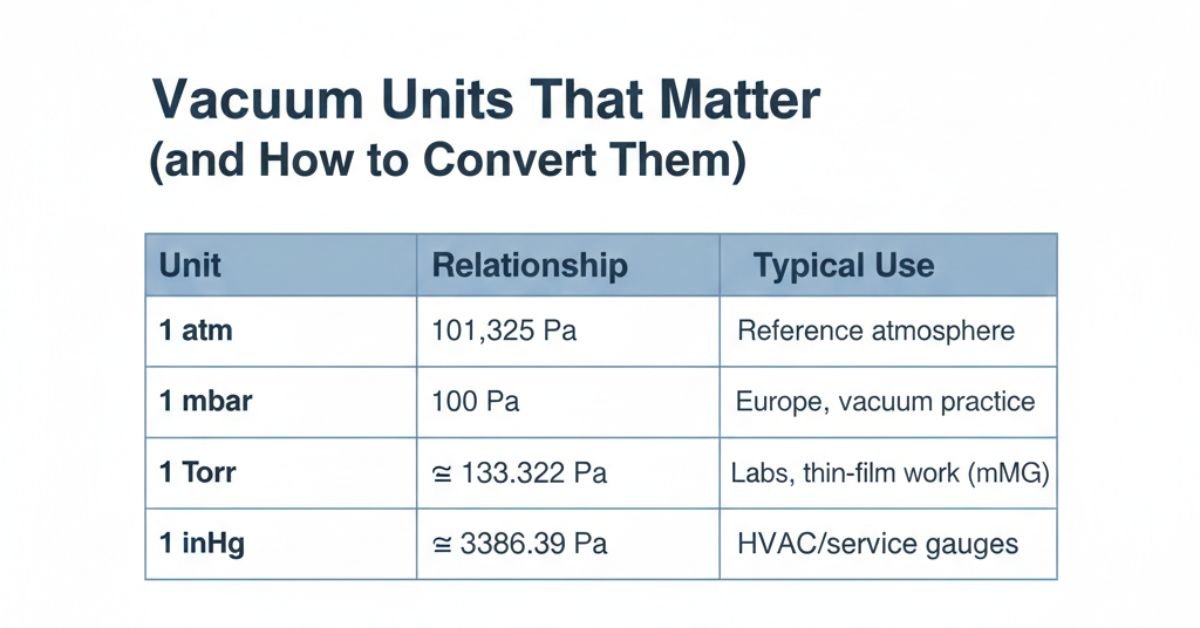
Common Measuring Vacuum unit conversions (approx.)
| Unit | Relationship | Typical use |
| 1 atm | = 101,325 Pa | Reference atmosphere |
| 1 mbar | = 100 Pa | Europe, Measuring Vacuum practice |
| 1 Torr | ≈ 133.322 Pa | Labs, thin-film work |
| 1 inHg | ≈ 3386.39 Pa | HVAC/service gauges |
Notes for practical interpretation:
- The SI unit of vacuum (as pressure) is the Pascal (Pa).
- When people discuss vacuum unit mmHg, they usually mean Torr-style reporting (historically tied to mercury columns).
- In some maintenance contexts, you’ll see measuring vacuum in mm (millimeters of mercury) because it matches legacy manometer practice.
Choosing the right gauge: match sensor type to pressure range
Different sensors “feel” pressure in different ways—force on a diaphragm, heat loss from a filament, ion current in a gas, or liquid-column height. No single gauge covers all regimes accurately.
Below is a practical comparison you can use for selection.
Vacuum gauge comparison table
| Gauge type | Best range (approx.) | Strengths | Watch-outs |
| U-tube manometer | ~100 kPa down to a few kPa | Simple, direct, accurate for higher pressures | Bulky, liquid handling |
| Bourdon/mechanical | Rough vacuum region | Rugged, low cost | Limited accuracy at deeper Measuring Vacuum |
| Diaphragm / capacitance manometer | ~10⁵ to 10⁻¹ Pa (model-dependent) | High accuracy, gas-type independent (capacitance) | Higher cost; needs care |
| Pirani / thermal conductivity | ~10² to 10⁻¹ Pa | Great for pump-down trending | Gas-dependent; needs calibration |
| Cold cathode / hot cathode ionization | ~10⁻² to 10⁻⁹ Pa | Enables high-Measuring Vacuum | Contamination sensitive; needs proper operation |
Practical tips:
- Use a diaphragm/capacitance gauge when accuracy matters across process gases.
- Use Pirani for reliable trends during pump-down.
- Use ionization gauges only when you’re truly in high vacuum and the system is clean.
In documentation, you may see the term “vacuum pressure gauge” used generically—what matters is confirming the sensing principle and valid range for your operating conditions.
Measuring suction (rough vacuum) in the real world
Most everyday “vacuum” applications aren’t deep vacuum at all—they’re simply partial pressure reduction to create suction: lifting, clamping, pick-and-place, brake boosters, packaging, and shop equipment. Here, the goal is often to function (grip force, flow, seal integrity) more than ultra-low absolute pressure.
If you’re asking how you measure vacuum suction, start by clarifying whether you care about:
- Maximum differential pressure (how much below ambient you get)
- Flow under load (how much suction you maintain while air leaks in)
- Response time (how fast suction builds and recovers)
Key methods and best practices:
- Use a relative gauge (often in kPa or inHg) placed near the suction cup or tool, not only at the pump.
- Measure both static vacuum (sealed) and dynamic vacuum (while lifting/flowing).
- If the question is how is vacuum suction measured in production, the most actionable answer is to measure at the point of use and then correlate readings to pass/fail outcomes (drop tests, grip force tests, cycle time).
Deep vacuum vs. high vacuum: what changes and why it matters
As pressure drops, the physics changes. In a rough vacuum, gas behaves like a continuous fluid. As you approach high vacuum, the mean free path increases and molecules collide more with surfaces than each other. This phenomenon is why gauge choice and placement become critical.
A common question is what a deep vacuum is usually measured in—in many technical contexts, it’s expressed in Torr, mbar, or Pa, often down to micro-scale values (e.g., 10⁻⁶ Torr or 10⁻⁴ Pa depending on the application).
Key facts for deeper regimes:
- Outgassing from chamber walls can dominate pump-down time.
- Virtual leaks (trapped volumes, blind holes) can mimic real leaks.
- Ion gauges can be influenced by:
- contamination
- filament condition (hot cathode)
- gas composition
- Conductance limitations mean a gauge near the pump can read “great” while the chamber is still higher.
Practical guidance:
- Add a gauge near the chamber, not just near the pump inlet.
- Use a two-gauge strategy: one for roughing (Pirani/diaphragm) and one for high Measuring Vacuum (ion gauge) if needed.
Evaluating pumps and systems: performance is more than “ultimate pressure.”
A pump spec sheet can be misleading unless you measure the system properly. The “ultimate pressure” is often measured under controlled conditions and may not represent your chamber, piping, valves, and contamination level.
For measuring vacuum pump performance, focus on three measurable outcomes:
- Pump-down curve: pressure vs. time from atmosphere to target
- Ultimate pressure in your system: after stabilization, with process hardware installed
- Recovery under load: how the system responds to known leaks or gas throughput
Key steps:
- Record pressure at consistent time intervals (e.g., every 10–30 seconds early on).
- Note valve states, gas ballast settings, and temperature (warm pumps often behave differently).
- If you can, repeat measurements after maintenance (oil change, seal replacement, bake-out) and compare curves.
What to look for:
- A curve that stalls early often indicates gross leaks or wrong gauge range.
- A curve that improves initially and then plateaus can suggest outgassing or back streaming/contamination.
The math behind vacuum: turning readings into usable engineering numbers
Once you trust your gauge, you can do real engineering with it—sizing, diagnosing, and validating. Even simple math helps you avoid misinterpretations.
A basic vacuum pressure formula often used in rough-Measuring Vacuum contexts is the relationship between absolute and gauge pressure:
- Pabs = Patm− Pvac
(when “vacuum” is reported as how much below atmospheric)
Or if a gauge reports negative gauge pressure directly:
- Pabs = Patm + Pgauge
Useful engineering interpretations:
- Force from suction (idealized):
F ≈ Δ P × A
Where ΔP is pressure difference and A is area.
- Pressure drops across lines and restrictions depend on conductance, which becomes crucial in higher vacuum.
Practical tips:
- Always log your assumed Patm if converting gauge-to-absolute.
- For calculations across sites worldwide, absolute units (Pa) reduce ambiguity.
Accuracy, calibration, and traceability: making readings trustworthy
In many industries (medical devices, aerospace, semiconductors), the number matters only if it’s defensible. That means calibration, uncertainty awareness, and documented procedure—not just a display reading.
A solid Measuring Vacuum program typically includes:
- Calibration schedule matched to criticality and drift history
- Traceability to national standards (often via accredited labs)
- Routine checks:
- zero checks (at known reference)
- span checks (at a known pressure point)
- Environmental controls:
- temperature stability
- vibration reduction
- clean electrical grounding for transducers
Common sources of error:
- Using a thermal gauge on a different gas than it was calibrated for
- Mounting location (pressure gradients across lines, throttles, cold traps)
- Contamination or oil vapor affecting sensor surfaces
- Misreading absolute vs. gauge instruments
Trustworthy references for terminology and best practice include:
- ISO vacuum terminology (ISO 3529): https://www.iso.org/standard/62728.html
- NIST (general measurement standards and uncertainty concepts): https://www.nist.gov/
- NASA technical resources on vacuum systems (collection varies by center): https://www.nasa.gov/
Troubleshooting with trends: two short case studies
Numbers become powerful when you compare them over time, not in isolation. This is where logging and baseline curves pay off—especially during process changes or maintenance cycles.
Case Study A: Packaging line loses holding force
Symptom: intermittent seal failures and dropped parts. The gauge at the pump looks fine.
Actions:
- Add a second gauge near the tool head.
- Measure under load (during actual pick cycle), not just static.
Findings:
- The tool-head vacuum drops sharply during actuation, indicating restriction/leak downstream.
- Root cause: cracked hose + undersized fitting causing pressure loss under flow.
Outcome:
- Replace hose, upsize fitting, and retest; failures stop.
Case Study B: Lab chamber won’t reach target pressure
Symptom: pump-down stalls above expected baseline.
Approach:
- Log pressure vs. time; compare to historical baseline.
- Use measuring vacuum pressure as a structured procedure: same starting point, same valve timing, same gauge location.
Finding:
- Plateau persists even after leak-check spray; suggests outgassing/contamination.
- Cleaning and mild bake-out restores the prior curve.
One vacuum pressure example interpretation: if your baseline used to reach 1×10⁻³ mbar in 30 minutes but now stalls at 5×10⁻³ mbar, the issue may not be the pump—it may be surface condition, moisture load, or a new internal material.
Practical checklist: how to pick, place, and use vacuum instruments safely
Once you understand ranges and limitations, day-to-day results come down to disciplined setup. If you need a repeatable method for how to Measuring Vacuum, use this checklist.
Best-practice checklist:
- Define the goal:
- target pressure (absolute)
- allowable variation
- acceptable pump-down time
- Pick the right sensor type for the pressure regime (rough vs. high Measuring Vacuum).
- Place the gauge where it reflects the process:
- near the chamber or point of use
- Avoid long narrow lines that create pressure gradients.
- Prevent damage and contamination:
- Protect gauges from condensable and particulates (filters/traps as appropriate).
- Don’t run ion gauges at pressures above their safe operating limit.
- Standardize your procedure:
- same starting conditions
- same valve sequence
- log pressure vs. time for comparison
- Train operators on units, reference pressure, and alarm limits.
Safety reminder:
- Measuring Vacuum vessels can implode; use rated chambers, guards, and proper inspection routines.
- Some Measuring Vacuum processes involve hazardous gases—follow local regulations and engineering controls.
FAQs
Is Measuring Vacuum as negative pressure?
It can be shown that way on gauge-referenced instruments, but physical pressure is not “negative” in absolute terms. Absolute pressure approaches 0 Pa as you move toward a perfect Measuring Vacuum.
Which unit should I use for vacuum: Pa, Torr, mbar, or inHg?
For engineering and international consistency, Pa (or mbar) is easiest. For HVAC service, inHg is common. Labs often use Torr. Choose one primary unit and convert consistently.
Why does my reading change with weather or altitude?
If your instrument is referenced to the atmosphere, changes in atmospheric pressure shift the baseline. Absolute gauges avoid this problem.
Why do two gauges disagree on the same system?
Different sensing principles respond differently to gas type, temperature, contamination, and placement. Also, one gauge may be out of range or improperly calibrated.
Do I need calibration for non-critical applications?
If the number drives pass/fail decisions or safety, calibrate. If it’s only for trend monitoring, you may still want periodic checks to catch drift and prevent false confidence.
Conclusion
Measuring vacuum is ultimately about translating “less gas” into a pressure value you can rely on—whether you’re checking suction in a packaging line or validating high-Measuring Vacuum conditions for a sensitive process. The most important takeaways are to define whether you need absolute or relative pressure, use the right unit system, choose a gauge that matches the pressure regime, and treat trends (pump-down curves and baselines) as your best diagnostic tool.
If you apply the checklists and comparisons above, you’ll avoid the most common pitfalls—wrong range, wrong location, wrong reference, and uncalibrated assumptions. For deeper learning, explore standards-based terminology (ISO 3529) and measurement concepts from NIST, and consider building an internal SOP for gauge placement, logging, and calibration intervals.
Visit the rest of the site for more interesting and useful articles.